
HUSQVARNA VIKING MINI PIPING FOOT
47,06 zł
+ Free ShippingHUSQVARNA VIKING MINI PIPING FOOT. Zaprojektowane z myślą o branży tekstylnej, aby maksymalnie usprawnić Twoją codzienną pracę. Insert package piping into seams and edges for a tailored finish. Cover cord with fabric for specialty piping. The clear view allows you…
Powiązane frazy: HUSQVARNA VIKING MINI PIPING FOOT · husqvarna viking stopki · kup husqvarna viking mini piping foot · husqvarna viking mini piping foot sklep · husqvarna viking mini piping foot dystrybutor Polska · oryginalne husqvarna viking stopki · husqvarna viking 413183045 · stopki husqvarna viking zimet · Husqvarna Viking · Maszyny do szycia · szycie
HUSQVARNA VIKING MINI PIPING FOOT – Zwiększ wydajność i precyzję
Odkryj możliwości, jakie daje HUSQVARNA VIKING MINI PIPING FOOT. To niezawodne rozwiązanie zaprojektowane z myślą o profesjonalistach z branży tekstylnej, które znacząco usprawni Twoją codzienną pracę.
Specyfikacja techniczna i szczegóły:
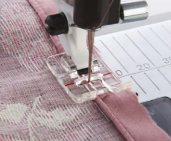
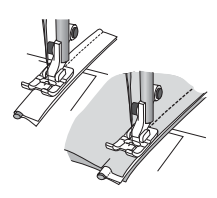
Insert package piping into seams and edges for a tailored finish. Cover cord with fabric for specialty piping. The clear view allows you to see the piping placement and see exactly where you are stitching and enables you to see the first row of stitching and adjust your needle position to stitch next to the original row. Straight stitch, length 2.5. To make piping from your fabric: 1. Snap on the Mini Piping Foot 2. Cut bias or crosswise grain strips wide enough to cover the cording plus seam allowances. 3. Lay the cording on the wrong side of the fabric strip and wrap the fabric over the cord. 4. Place the fabric and the cord under the Mini Piping Foot with the cord in the groove on the underside of the foot. 5. Sew. The groove will guide the cord so the fabric covers it evenly. Hint: When you sew this piping into a garment or other project, adjust the needle position so it stitches one position closer to the cord, to cover the first stitching. To stitch piping into a seam: 6. Snap on the Mini Piping Foot 7. Place the piping along the seam line of the right side of the fabric and stitch in place with the piping in the groove of the foot. 8. Place the second piece of fabric on top with the right sides together. 9. Put fabric and piping layers under the Mini Piping Foot with the piping in the groove on the underside of the foot. Sew. The groove on the underside of the foot will guide the piping as you sew. Insert package piping into seams and edges for a tailored finish. Cover cord with fabric for specialty piping. The clear view allows you to see the piping placement and see exactly where you are stitching and enables you to see the first row of stitching and adjust your needle position to stitch next to the original row. Straight stitch, length 2.5. To make piping from your fabric: 1. Snap on the Mini Piping Foot 2. Cut bias or crosswise grain strips wide enough to cover the cording plus seam allowances. 3. Lay the cording on the wrong side of the fabric strip and wrap the fabric over the cord. 4. Place the fabric and the cord under the Mini Piping Foot with the cord in the groove on the underside of the foot. 5. Sew. The groove will guide the cord so the fabric covers it evenly. Hint: When you sew this piping into a garment or other project, adjust the needle position so it stitches one position closer to the cord, to cover the first stitching. To stitch piping into a seam: 6. Snap on the Mini Piping Foot 7. Place the piping along the seam line of the right side of the fabric and stitch in place with the piping in the groove of the foot. 8. Place the second piece of fabric on top with the right sides together. 9. Put fabric and piping layers under the Mini Piping Foot with the piping in the groove on the underside of the foot. Sew. The groove on the underside of the foot will guide the piping as you sew.
- Solidna konstrukcja: Gwarantuje wieloletnią bezawaryjną pracę nawet przy intensywnym użytkowaniu przemysłowym.
- Wysoka wydajność: Zwiększa tempo pracy i optymalizuje procesy produkcyjne w Twojej szwalni.
- Łatwość obsługi: Intuicyjne działanie skraca czas wdrożenia i podnosi komfort codziennej pracy.
Wskazówka od eksperta: Chcesz mieć 100% pewności kompatybilności? Wpisz model swojej maszyny w uwagach do zamówienia. Zweryfikujemy to i wyślemy idealnie dopasowany produkt!
Polecane akcesoria: Aby zapewnić najwyższą jakość, rekomendujemy stosowanie oryginalnych części oraz dedykowanego oleju do maszyn z naszej oferty.
Tagi SEO: #husqvarna #viking #mini #piping #foot #szycie #maszynydoszycia #szwalnictwo


Opinie
Na razie nie ma opinii o produkcie.